One of the most popular ways to automate interactions and make users’ experiences better on Telegram is to build a bot for the app. This complete guide will show you how to make a telegram bot for customer service, entertainment, or business automation, no matter what you want it to do. You’ll learn how to make a bot that meets your needs without needing a lot of coding experience. You’ll start by using BotFather to set up your first bot and then move on to deploying and testing it. This tutorial is worth your time because it gives you useful, actionable information that will help you understand how to make a bot and start making your own automated solutions right away.
What Is a Telegram Bot and Why Should You Create One?
A telegram bot is an automated account that can talk to people through the Telegram messaging app. It can respond to commands, send notifications, and do other things without any help from a person. A bot works through the Telegram Bot API, which lets developers build and run complex automated systems that can do everything from simple chat responses to complicated business processes. This is different from regular user accounts. A telegram bot is like a digital assistant that can work all the time to help your users.
The best thing about making your own bot is that you can use it in many ways and it is easy to get to. You can use bots to automate customer service, send alerts to subscribers, manage groups or channels, and even connect with outside services like OpenAI or ChatGPT to give smart answers. Telegram bots are very appealing because they can always be online, handle multiple conversations at once, and give users consistent, reliable service. If you don’t plan ahead, a bot might not work, but a well-made telegram chatbot can change the way you talk to your audience.
Making your bot doesn’t require a lot of coding knowledge, so business owners, marketers, and people who want to automate different parts of their online presence can all do it. Telegram has everything you need to make your idea a reality, whether you want to make a simple notification bot or a complicated chatbot that can answer customer questions. Users can talk to your bot in a natural way, which makes it a great place for people to talk to your bot.
Getting Started with BotFather: Your Gateway to Bot Creation
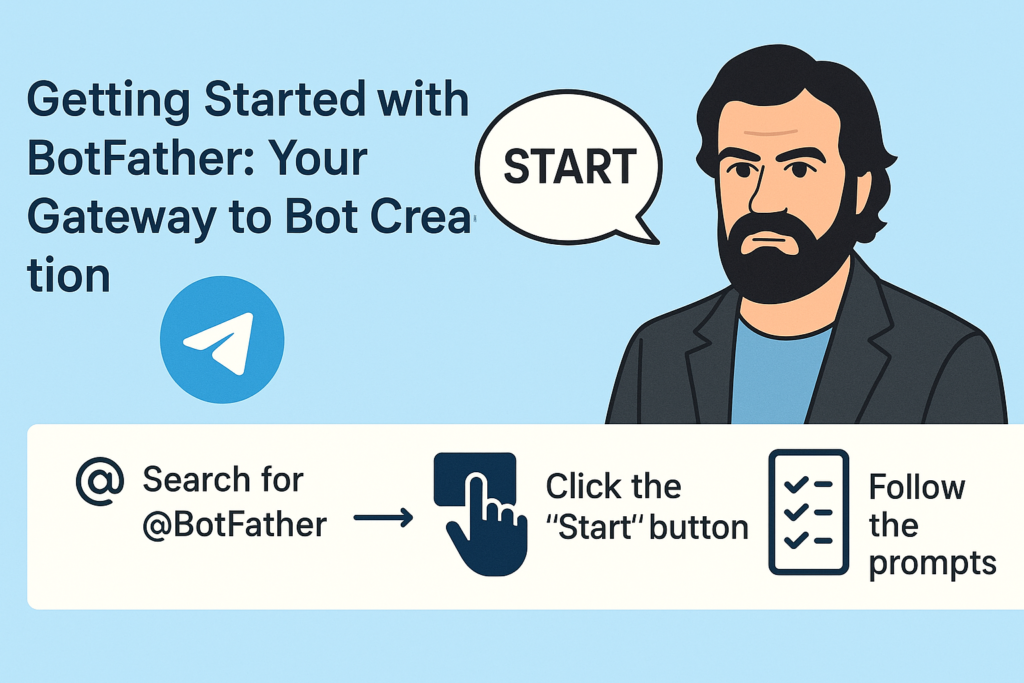
The official bot for Telegram is BotFather, which is the main place to create and manage all bots. This special bot is the main way for you to make, set up, and manage your telegram bots. To start making your bot, open the Telegram app and search for “@BotFather.” When you find it, click the “Start” button to start making your first bot.
When you first talk to BotFather, you’ll see a list of commands that let you make and control your bots. The interface is easy to use and will help you make your bot by giving you clear instructions and prompts at every step. BotFather will ask you for important information about your bot, such as its name and the username you want it to use. This step-by-step guide makes the process easy for people who don’t have a technical background.
It’s important to know how to use BotFather well because you’ll need to go back there to change your bot’s settings, profile picture, description, or list of commands. BotFather also lets you use advanced features like inline query support and webhook configuration, which makes it an essential tool for your bot’s entire life. When you learn how to make things with BotFather, you’re learning the most important skill you’ll need for all future bot development.
How to Create a Telegram Bot: The Initial Setup Process
To make a telegram bot, the first step is to send the command “/newbot” to BotFather. This simple command starts the process of making a bot and opens an interactive session in which BotFather will ask you for specific information about your new bot. Making something is easy and usually only takes a few minutes, so anyone who wants to make their own automated assistant can do it.
When you type in the “/newbot” command, BotFather will ask you to give your bot a name. Users will see this name when they talk to your bot, so it should be easy to remember and describe what it does. After you give your bot a name, you need to make a username for it. This username must end with “bot,” like “myawesomebot” or “customer_service_bot.” You might have to try a few different usernames before you find one that is available on all of Telegram.
BotFather will give you an API token after you successfully make your bot. This is a long string of characters that identifies your bot and gives you access to the Telegram Bot API. This token is very important for your bot to work because it lets it send and receive messages through API calls. You must keep this token safe and use it in your bot’s code to verify requests and let the bot talk to Telegram’s servers. This is when you can start adding features to your telegram bot after you’ve made it.
Choosing the Perfect Name and Username for Your Bot
It’s more important than many beginners think to choose the right name and username for your telegram bot. Subscribers will see the name in their chat list, and new users will see it when they first find your bot. It should be easy to remember and professional, and it should make it clear what your bot does. For instance, if you’re making a bot to handle customer service, names like “Support Assistant” or “Help Desk Bot” make it clear what the bot does and help users find what they need.
Users can find your bot through Telegram’s search function by using the bot’s username. Other developers can also use the bot’s username to refer to your bot in their apps. The username has to be unique and end with “bot,” so you should pick something that is both easy to remember and brandable. Think about adding your business name, the bot’s main purpose, or keywords that people might use when looking for a bot on Telegram that is similar to yours.
When BotFather asks you for this information during the bot creation process, keep in mind that you can change the bot’s name and description later using the edit your bot commands, but the username is permanent once you choose it. This makes choosing a username very important because you won’t be able to change it without making a new bot. Before you make your final choice, take some time to think of a few options and make sure they are all available. People will be able to use your bot more easily if you choose a name and username that are easy to remember.
Understanding the Telegram Bot API and Its Capabilities
The Telegram Bot API is what makes all of the bots on the platform work. This full bot API gives developers everything they need to make complex automated systems that can handle different types of user input, send messages in different formats, and work with other services. Anyone who wants to make more than just a basic response bot needs to know what the API can do. The telegram bot api has a lot of features that can turn simple bots into powerful automation tools.
The bot API can handle many kinds of messages, such as text, photos, documents, audio files, and even location data. Users can give your bot commands, ask questions, and get back rich content like custom keyboards, inline buttons, and formatted text. The API also lets your bot work in groups or channels, manage channel subscriptions, and handle complicated workflows that require multiple users to interact with each other. The API gives you the endpoints you need to send alerts or notifications to your bot through https requests.
One of the best things about the Telegram Bot API is that it can handle webhook connections. This lets your bot get updates from Telegram servers in real time. This means that your bot can answer user messages right away instead of having to keep checking for new ones. The API also lets you connect your bot to databases, AI services like OpenAI, payment processors, and other third-party platforms, which lets you make complete automated solutions. You need the webhook feature to make and control interactions in real time.
How Do You Connect Your Bot to External Services?
You can automate and improve your bot’s features in endless ways by connecting it to external services. The most common method is to use webhooks to get updates from Telegram and then use API calls to other services based on what users do. With this setup, your bot can get real-time data, handle complicated requests, and give dynamic responses that are much more than just simple pre-programmed messages. You’re making a connection between Telegram and the rest of the internet when you connect your bot to services outside of Telegram.
If you want to add ChatGPT or OpenAI features to your business, you’ll need to set up your bot to get user messages, send them to the AI service to be processed, and then send the responses back to the users. This makes a smart chatbot that can talk to people in their own language, answer questions, and give them help that is specific to them. To make sure the service is reliable, the integration needs to handle API keys and errors correctly. This method lets your bot give smart, context-aware answers that make talking to it feel natural and helpful.
You need to host your bot on a reliable server or cloud platform if you want it to always be online and respond. You can use VPS hosting, Heroku, or other cloud services that can keep your bot code running all the time. It is important that the hosting solution you choose for Telegram can handle HTTPS requests because Telegram needs secure connections for webhook communications. With the right hosting, your bot can handle multiple conversations at once and keep performing well even when it’s busy. When you host your bot correctly, each user can count on getting the same service every time.
What Commands Can Your Telegram Chatbot Handle?
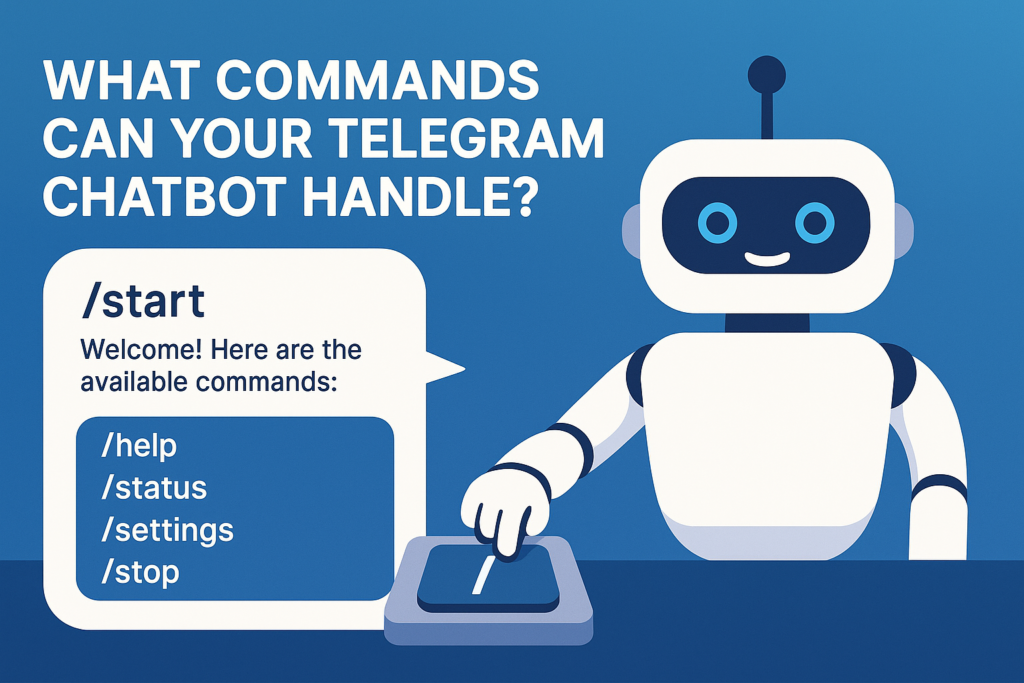
A well-made telegram bot can take a lot of different commands, making it easy and quick for users to interact with it. The command “/start” is the most basic one. It usually sends a welcome message and tells new users what your bot can do. From there, you can make commands that fit the specific job your bot needs to do, like giving information, handling requests, or making transactions easier. It should be easy to remember and clearly define these commands that will make your bot work.
When people type “/” in a chat with your bot, BotFather lets you make a list of commands that will show up for them. This list of commands is like a menu that shows users what your bot can do. Some common command patterns are “/help” to get help, “/status” to check current information, “/settings” to see configuration options, and “/stop” to end interactions or stop getting notifications. When users get commands, they should get clear, useful answers that help them figure out what they can do.
Advanced bots can also understand natural language input that isn’t formal commands. If you connect your bot to AI services, it will be able to understand conversational messages and respond correctly without users having to learn how to use specific command syntax. This method makes your bot easier to use and more accessible, especially for people who like talking to it in a natural way instead of giving it structured commands. You can also use inline keyboards that show options as clickable buttons. This makes it easier for users to talk to your bot without having to type commands. The keyboard feature makes the user experience much better.
How to Test Your Bot Before Going Live?
Before making your bot available to users, it’s important to test it thoroughly to make sure everything goes smoothly and to find any problems that might come up. As soon as you get your API token from BotFather, you should start testing and debugging. First, make sure your bot can send and receive simple messages. Then, test it with more complicated features like handling commands, processing user input, and connecting to other services.
Make a simple test environment where you can use your bot like a normal person would. Send different kinds of messages, such as valid commands, invalid input, and edge cases that could lead to mistakes. Keep an eye on how long it takes to respond, how the messages are formatted, and how the conversation flows as a whole. If your bot has inline keyboards or custom keyboards, make sure to test all of the buttons to make sure they do what they are supposed to do. This methodical way of testing helps you find problems before any new user runs into them.
Testing bots that connect to other services is harder because you have to make sure that API calls work, that errors are handled correctly, and that data is processed correctly. You might want to make a staging version of your bot that uses test APIs or sandbox environments for services that are outside of your control. You can do thorough testing with this method without affecting production systems or having to pay for API usage during development. You can be sure that your bot works reliably if you set up a simple testing protocol.
How Can You Edit Your Bot Settings and Features?
After you make your bot, you can use different commands in BotFather to change its settings and features. The “/mybots” command shows you a list of bots that are linked to your account. You can then choose the bot you want to change. From there, you can change the bot’s name, description, profile picture, and other settings that change how people see and use your bot. This flexibility lets you keep making your bot’s presentation better.
Updating your bot’s description to better explain how it works, changing its profile picture to match your brand, and changing the list of commands to show new features or changes in functionality are all common editing tasks. If your bot needs to work in other chats or channels, you can also change the privacy settings, turn on or off group functionality, and set up inline query support. These settings are the basis for user interaction when you need to make new responses or change old ones.
To change how your bot works or add new features, you need to update its code and redeploy it to your hosting platform. This could mean adding new command handlers, changing response messages, or connecting to more outside services. Keep in mind that you need to update the code for your bot’s core features, but you can often make cosmetic and configuration changes directly through BotFather. You can keep your bot useful and relevant to your users by constantly improving it.
Advanced Bot Features: Keyboards, Inline Queries, and More
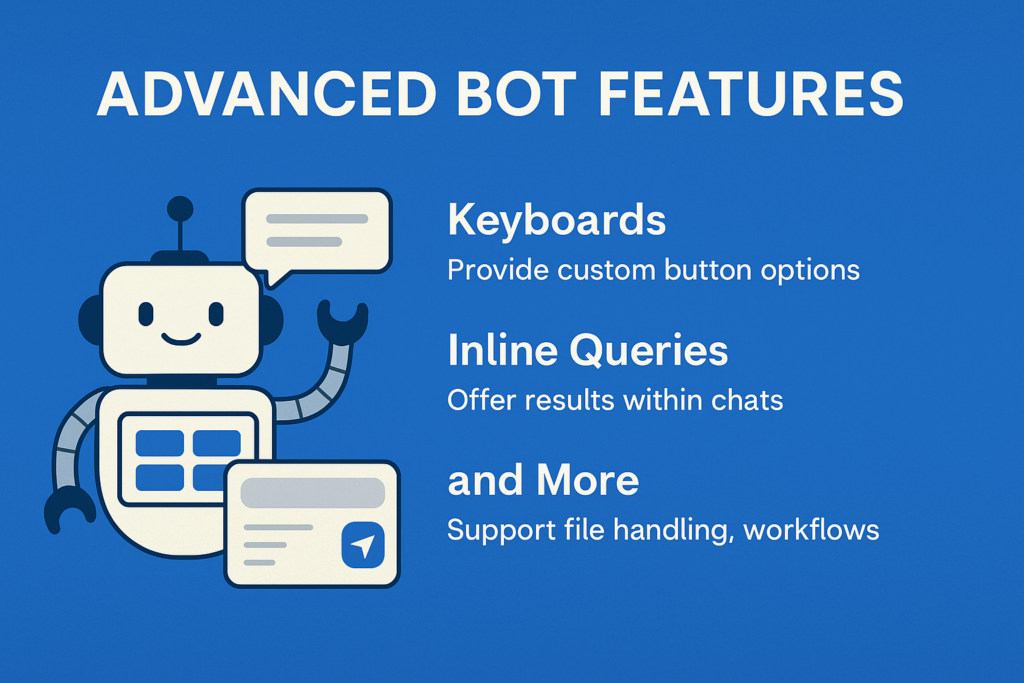
Advanced telegram bot features can make it much easier for users to interact with your bot and give it more capabilities than just having text-based conversations. Custom keyboards let you give users buttons with pre-set options, which makes it easier for them to use your bot’s features without having to type in specific commands. These keyboards can stay on the screen for the whole conversation, or they can only show up when they are needed for the current interaction. The keyboard’s features are necessary for making user interfaces that are easy to use.
Inline queries let your bot work in other chats and channels, so people can use your bot’s features while talking to other people or posting in groups. If someone types your bot’s username and a question into any chat, your bot can give them relevant results that they can share with others. This feature is especially helpful for bots that help people find information, make content, or do useful things that people might want to share. The inline feature lets your bot do more than just talk to people directly.
Other advanced features include the ability to handle files, which means your bot can process documents, images, and other types of media that users send. You can also set up flows or bulk campaigns that help users through complicated tasks one step at a time, keep track of users’ states between interactions, and make experiences that are unique to each user based on their preferences or past interactions. If you need to set up complex automation, you can use the SendMessage API method to send specific content. You can set up responses for common situations ahead of time, but you can still have dynamic interactions. These features need more advanced programming, but they can make bot experiences that are very interesting and helpful, and they can be used to automate complicated business tasks.
Key Takeaways: Essential Points to Remember
• Start with BotFather: All telegram bot creation begins with the official BotFather bot, which provides the tools and API tokens needed to create and manage your automated assistant.
• Choose names wisely: Your bot’s name and username are crucial for discoverability and user recognition, with usernames being permanent once selected.
• API token security: Keep your bot’s API token secure as it provides complete access to your bot’s functionality and communication capabilities through the bot api.
• Test thoroughly: Always test your bot comprehensively before making it available to users, including edge cases and error scenarios through proper testing and debugging.
• Plan for hosting: Decide early whether you need your bot to be always online and choose appropriate hosting solutions like VPS or Heroku platforms.
• Start simple: Begin with basic commands and features, then gradually add complexity as you become more comfortable with bot development and the process of creating advanced functionality.
• User experience matters: Design your bot’s commands and interactions to be intuitive and user-friendly, considering both new user experiences and returning users.
• External integrations: Leverage APIs from services like OpenAI or ChatGPT to create more intelligent and capable bots that can handle complex queries and provide valuable responses.
• Continuous improvement: Use BotFather’s editing features to refine your bot’s settings and description as you add new features and capabilities to better serve your subscribers.
• Documentation is key: Maintain clear documentation of your bot’s features and commands to help users understand how to interact with your automated system effectively, ensuring smooth user interaction with your bot and enabling them to get the most value from your creation.


Related items

Telegram’s ad revenue sharing program has become a big way for channel owners and content

Effective community management depends on knowing how to become an administrator on telegr

With its great sticker capability, which lets users express themselves via imaginative vis